
If you live in a rural area and own an RV, you might be wondering if it’s safe to dump RV wastewater into your home’s septic system. Isn’t it simpler to connect a line from your rig to your home’s septic tank?
You can dispose of RV wastewater into septic tanks in your home. However, this does come with a lot of responsibility. There are numerous ifs, buts, and ands that accompany this statement. You will be able to use your home’s septic tank to empty your RV’s black and gray water tanks.
The article below provides a step-by-step guide for disposing of your RV waste at home. We will discuss the different kinds of RV water tanks you get, What they get used for, and cover some safety tips. Lastly, we will also talk about another way to dispose of wastewater.
Steps You Should Follow When Dumping Rv Waste At Home
It’s crucial to check local laws and regulations before emptying your RV’s holding tanks. Removing RV waste from your tanks to your private septic system may be legal in some regions.
However, some cities and municipalities have laws limiting or preventing RV wastewater from emptying at private dwellings. Before dumping black or gray waste at their house, all RV owners should properly study homeowner association laws and municipal ordinances.
While it is frequently allowed to dump your RV tanks at home, it is never safe or legal to dump RV tank trash on the ground. RV black tanks’ raw sewage must get disposed of in a septic tank, dump station, or municipal sewer system.
Soap and other chemicals should not get poured out in the open. You are permitted to dump RV waste at your home utilizing one of the below techniques to drain the tanks appropriately. If you plan to dump at home frequently, you might want to hire a professional to install an RV sewer connection.
1. Select The Appropriate Parking Space
Before you begin, double-check that your RV is parked correctly.
You’d be shocked how much time you can save by taking the time to measure. It would help if you weren’t parked further than the distance between the hose and the drain, yet many novices overlook this.
2. Have Appropriate Lighting At Hand
When dumping at night, ensuring you can see what you’re doing is very important. No one wants to feel their way around a septic tank. Invest in a modest battery-powered headlamp to save time and effort fumbling around with a flashlight when you need both hands.
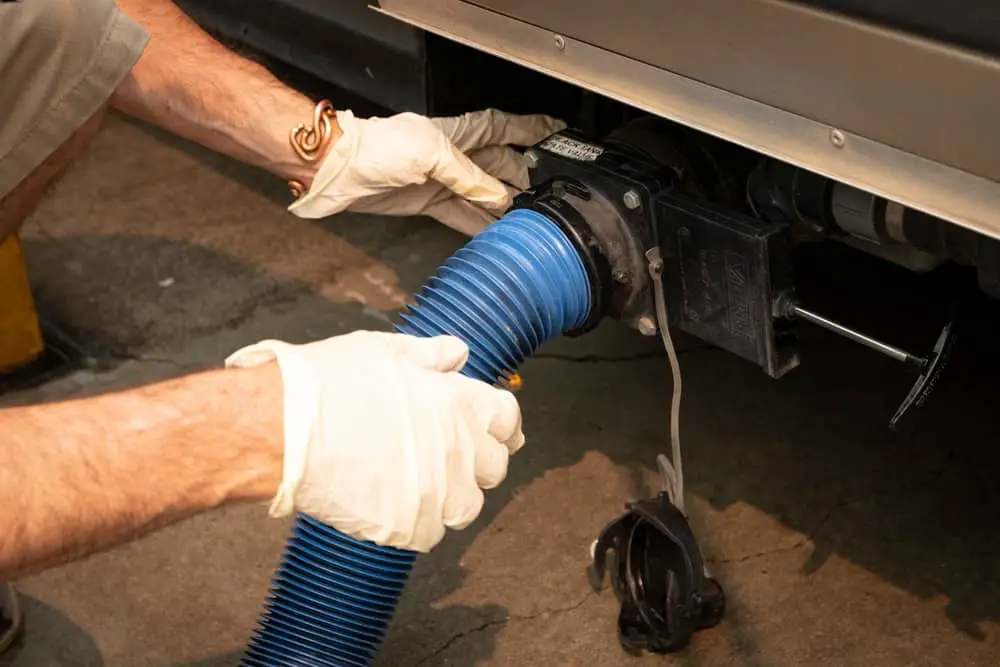
3. Attach The Hose
Once you’ve located the waste outlets, double-check that they got securely fastened to the fitting.
For novices, forgetting to double-check the hose connection is another primary source of waste-disposal disaster that can get avoided with a little double-checking. The hose should be connected to both the gray and black water tanks at the same time for proper disposal.
4. Make Sure The Hose End Is Secure
The hose’s other end should preferably run to an appropriate drainage system, not a storm drain or directly into grass or soil. To ensure that the hose does not snake around once opened, use bricks or weights to keep the hose steady and firmly grounded.
5. Open The Gate Valve
Open the gate valve slowly to make sure everything is OK. The waste should flow unhindered if you’ve done everything right up to this point. There’s always a slim chance of a blockage, but it’s unlikely since the chemicals used break down the solid waste and prevent blockages from becoming a problem.
6. Flushing The Tank
Allow inward flow of water into the RV tank to flush the tank, usually with a chemical solution. After many hours, discharge the solution in the same manner as you would waste – and consider the tank flushed. For sanitary reasons, use a different hose when flushing the tank.
Remember to close the valves carefully to avoid spillage, mishaps, or unintentional leaking. If you find that the connection feels “a little loose,” this suggests that it’s time for a replacement.
What If You Can’t Dump At Home?
You’ll need to find a local dump station if you can’t dump your RV tanks at home or if you need to empty a portable tank. The AllStays Camp & RV app is the quickest method to find a dump station near your house or route. The app is $10, but it has the most comprehensive directory of RV services in the country.
Safety Tips You Should Follow
Avoiding contact with any wastewater is the best way to keep yourself safe. As a result, double-check your connections, apply septic hose weights to keep the sewer hose from popping out of the sewer connection, wear gloves, and wash or sterilize your hands afterward.
1. Always Wear Gloves And Sanitize
Wear gloves when working with (or disposing of) any waste material. Also, make sure these gloves are high-quality and leak-proof. Even while cooking gloves appear appropriate, they can increase the risk of waste exposure rather than reduce it: Surgical gloves are simpler to use and can get discarded afterward.
Even if you’re wearing gloves, washing your hands with soap and water is the best, but if you cannot, sanitize your hands after, it ensures that no germ traces remain to spread from your hands to anything you might touch.
2. Examine for Leaks
Regularly check your tanks, pipes, and attachments for leaks to avoid potential waste spills. Most of the time, you’ll know when one of the three tanks or linked hoses has sprung a leak someplace – but always double-check before connecting a valve or opening the flow.
3. For Unintentional Spills, Use Lime
Accidental spills happen, and you’re the only one who can keep them from becoming a hazard. Lime can get sprayed on the grass where sewage or garbage got spilled by accident, but significant spills may require the services of a professional.
4. Accidental Exposure To Waste
Accidental fecal matter exposure and the associated chemicals are dangerous to your health, and it’s more than simply a comedic RV story around the campfire. If your skin gets into contact with waste during the cleaning and drainage procedure, clean up immediately. Symptoms may become severe in extreme cases, and they may not appear for days or weeks after exposure. See a doctor if you suspect you might have an infection because of exposure.
Another Way To Dispose Of Waste
There is another way if you can’t park your RV close enough to the cleanout stub to empty your tanks. Another option for at-home dumping is to empty the contents of an RV tank into a portable waste holding tank rather than directly into the sewer system.
As a dumping option, many RV blogs recommend the bucket approach, in which wastewater is poured directly into a plain old bucket. However, we strongly advise against that alternative, prone to spills and splashes. A waste container specifically intended to collect waste is much safer and sanitary.
1. Pick the Right Tank
You must first purchase a portable waste holding tank before you can begin dumping. Before you buy, look up the capacity of your RV’s black and gray water tanks in your owner’s manual. Your portable tank or trash tote should store the same water as your largest holding tank. If your portable tank capacity is smaller than your black or grey tanks, it is advised to dump more often to avoid overflow.
2. Connect the RV Portable Sewer Tank
Connect the RV’s sewer hose to the portable tank’s drain valve. To secure a connection to the portable tank, you can utilize an elbow connector. Always extend your hose to its full length and double-check for kinks or tight curves that could obstruct flow.
3. Remove the Black Tank and empty it.
To empty the black tank, pull the black tank valve handle to open it and allow it to drain. Keep an eye on the black tank as it empties. Close the black tank valve when the portable tote is three-quarters filled if the portable tote is smaller than your black tank. Closing the black tank before the tote is full allows all of the waste from the hose to drain without overfilling the tote.
After dumping your portable tank, transfer it to your sewer cleanout or a nearby dumpsite. To empty the waste, connect a sewage hose to the tote’s dump valve and the dump station, then open the vent. Repeat the technique until your black tank is empty if you’re using a smaller tote.
4. Remove the Gray Tank and empty it.
Drain the gray tanks in the same manner as the black tanks. Always empty the gray tank(s) following the black tank to clean the portable waste tank. Repeatedly dump until all gray tanks are empty.
5. Clean the Portable Waste Tank
Fill the tote with fresh water from a nearby dump station or your outside faucet. Then, using the same procedure as before, drain the portable tank of waste and gray water. Repeat the process until the waste tote’s water is clear.
Different Kinds Of Water Tanks
It’s a good idea to keep track of where your various tanks are located and which water tank holds what. There are three different types of tanks on an RV
Fresh Water Storage Tanks
Potable water gets stored in the freshwater tank for usage in an RV camper. Water from the fresh water tank gets piped into the RV for the sinks and shower. You have to fill up your RV fresh water tank when your RV is not attached/linked to the City or campground water supply. Before consuming water from the RV taps, clean the fresh water tank if it becomes polluted by foul or foreign water.
Gray Water Storage Tanks
Used freshwater gets stored in the gray water tanks. The gray water tanks catch the water drained from the shower, kitchen, and bathroom sinks. Separate gray water tanks for the kitchen and bathroom are standard in bigger RVs.
Although the water in the gray tank was once fresh, it should no longer be considered clean or environmentally friendly. Soapy water and food particles are present in the gray tank. The water in the gray tank should get treated as wastewater.
Black Water Storage Tanks
Everything that goes into the RV toilet gets stored in the black water tank. Only human waste and RV-friendly toilet paper should get flushed in the black tank. Other paper types will clog the black tank and make a huge mess. It’s never good to leave a black tank valve open. Close the black tank until you’re ready to begin dumping the nearly full tank.
Adding Chemicals To Your Black Water Tank
After emptying your RV’s black water tank, we usually recommend applying chemicals. On the other hand, the EPA warns that the chemicals used in these tank treatments and deodorizers could contaminate soil and groundwater and cause septic system damage.
Choose a biodegradable tank treatment that does not contain chemicals specified in the EPA guidance. Camco offers a citrus-scented tank treatment that is completely biodegradable and free of harmful chemicals.
How To Maintain Your RV Tanks
The maintenance of your RV’s water tanks is one of the most critical aspects of overall RV maintenance: a leaking, dirty, or neglected tank will reduce the value of your RV and, yes, make it more dangerous to drive or park.
Using appropriate RV tank cleaning solutions keeps your tanks clean and slows the spread of bacteria.
If your RV has been stored for a long time or recently purchased, always clean the tanks first. Leaks can sometimes get rectified, but tank replacement may be the best solution in some cases. Lubrication of valves is also required.
How Often Should My Black Water Tank Be Emptied?
When your RV’s black tank is at least 2/3 full or more, it’s time to dump it. You may watch the levels using your tank sensors. Keeping a regular eye on your black tank level will save you from an unwanted overflow and cleanup.
Conclusion
It is simple to learn how to dump your RV tanks at home, as you saw. However, the first few times may be stressful, but remembering the few easy steps will save you a lot of effort and cleanup time when you dump your RV waste properly at your house. You should also follow the safety tips, like wearing gloves, not spilling waste, checking for leaks, sanitizing, etc.
Good luck, and happy camping!
Check out our article on: How To Use Black Tank Flush System?